

A roof can look new from the ground and still contain installation problems that shorten its service life. In Greene, NY, roofs must handle rain, snow, freeze-thaw cycles, wind, ice buildup, and seasonal temperature changes, so small construction flaws can become leaks or moisture damage over time.
Poor installation is not always obvious immediately. Some defects appear after the first heavy storm, while others develop gradually in the attic, along roof edges, or around chimneys and vents.
What are the clearest signs of a poorly installed roof?
The most common warning signs include uneven shingles, exposed fasteners, missing flashing, inadequate ventilation, loose edges, and water stains that appear soon after the roof work is completed.
A single irregularity does not always prove that the entire roof was installed incorrectly. However, several problems in different areas usually deserve closer attention.
Shingles that look uneven or poorly aligned
Shingles should form consistent horizontal courses with straight lines from one side of the roof to the other. Noticeable waves, humps, gaps, crooked tabs, or uneven spacing may indicate problems with layout, fastening, the roof deck, or the shingles themselves.
Look for:
- Shingles that appear to rise or buckle
- Courses that drift out of alignment
- Gaps between shingle sections
- Shingle edges that do not lie flat
- Exposed areas where the underlying material is visible
Some temporary waviness can occur while asphalt shingles settle, especially in cool weather. Persistent buckling or lifted sections are more concerning, particularly after warm weather or several storms.
How can flashing problems reveal poor workmanship?
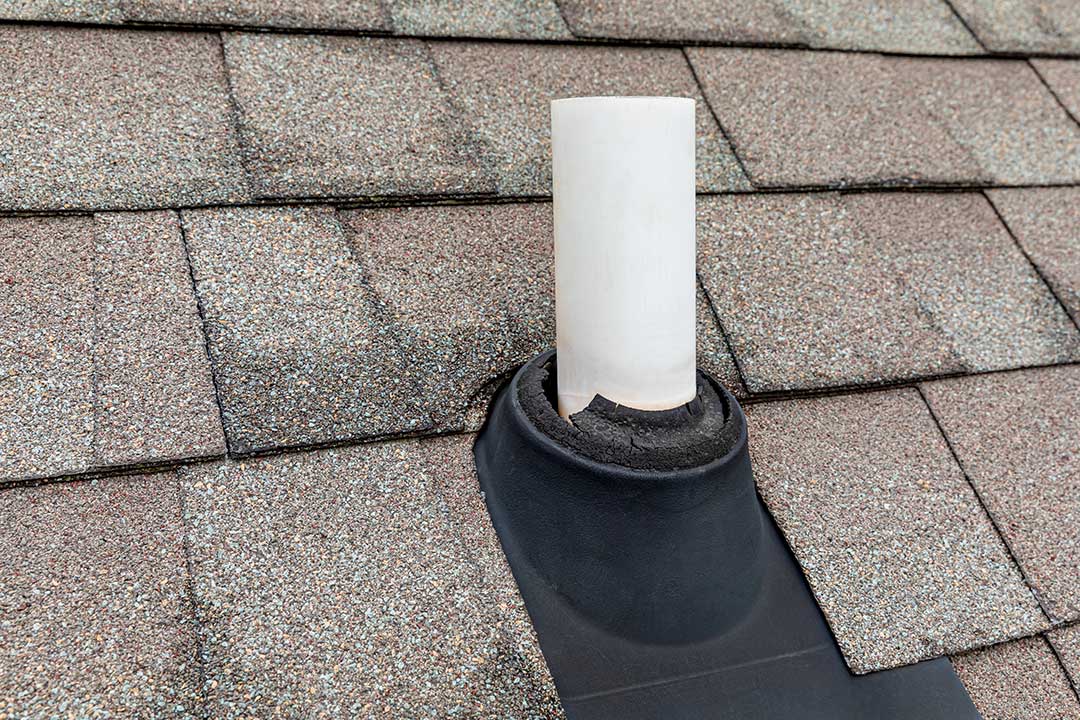
Flashing is the material that helps direct water away from vulnerable locations. Missing, poorly layered, or improperly sealed flashing is one of the most serious installation concerns because roof leaks often begin where the roof meets another surface.
Pay close attention to:
- Roof-to-wall intersections
- Chimneys
- Plumbing vents
- Skylights
- Valleys where two roof slopes meet
- Dormers and other raised structures
- The lower edge of roof-wall intersections
Step flashing should be integrated with the shingles so water flows over each layer rather than behind it. At the end of a roof-to-wall intersection, kick-out flashing helps direct water away from the wall and into the gutter area. If these details are missing or hidden behind siding, moisture can enter the wall even when the shingles look intact.
Caulk alone is not a substitute for properly layered flashing. Sealant can shrink, crack, or separate as temperatures change.
Are exposed or misplaced nails a warning sign?
Yes. Roofing fasteners should be placed where they secure the shingle without leaving vulnerable holes exposed to weather. Nails driven too high, too low, at the wrong angle, or through visible portions of the shingle can create leak paths.
Common warning signs include:
- Nail heads visible on the finished roof
- Nails that appear driven through the top edge of a shingle
- Nails protruding into the attic
- Loose shingles near fastener locations
- Excessive use of roofing cement to cover nail heads
A few visible fasteners may be associated with specific roof components, but unexplained exposed nails across the field of the roof should be examined. From inside the attic, daylight around fasteners is a particularly clear indication that the roof covering or underlayment may not be sealed correctly.
What does poor roof ventilation look like?
Improper ventilation may not cause an immediate leak, but it can contribute to premature aging, condensation, mold growth, and winter ice problems.
Warning signs inside the attic or on the roof include:
- Heavy frost or moisture on the underside of the roof deck
- Damp insulation
- Musty odors
- Dark staining on roof sheathing
- Rusted nails or metal components
- Excessive heat in the attic during summer
- Shingles that age unusually fast or curl at the edges
A properly balanced system generally allows air to enter near the lower roof edges and leave through high points, while insulation and air sealing limit warm household air from reaching the roof deck. Adding vents without providing a suitable intake path may not solve the underlying problem.
In a cold-weather climate, attic moisture and air leaks can also contribute to ice dams. Ice dams are not always proof of poor installation, but repeated ice buildup may justify checking insulation, air sealing, ventilation, and roof-edge details together.
What drainage defects should homeowners watch for?
Water should move off the roof and into the gutter system without collecting behind roof edges or overflowing at unusual points. Poor slope transitions, blocked valleys, improperly installed underlayment, or missing edge protection can interfere with drainage.
Inspect from the ground for:
- Water staining below roof valleys
- Sagging or detached gutters
- Drips behind gutters
- Shingles that extend too far or not far enough over the edge
- Exposed underlayment at the eaves
- Persistent ponding on low-slope sections
- Erosion or staining on exterior walls below roof intersections
Water entering behind the fascia or along a roof edge can damage sheathing and framing before the interior ceiling shows a stain.
Can interior problems prove that installation was poor?
Interior evidence can show that water is entering somewhere, but it does not always identify the exact source. A ceiling stain may originate uphill from the visible mark because water can travel along roof decking, insulation, rafters, or framing.
Check the attic and upper floors for:
- Fresh or expanding ceiling stains
- Peeling paint near exterior walls
- Damp insulation
- Mold-like spotting
- Soft roof decking
- Drips after rain or thawing snow
- Water around vent pipes or skylights
New leaks soon after roofing work deserve prompt attention. The timing does not automatically prove installation failure, since pre-existing structural or flashing conditions may have been concealed, but it is useful information when evaluating the problem.
What should a homeowner check after a new roof is installed?
A basic ground-level inspection can identify many visible issues without climbing onto the roof. Look for loose debris, exposed underlayment, damaged siding, bent flashing, and shingles left on the ground or in gutters.
Useful records include:
- The date the work was completed
- Areas where repairs or replacements occurred
- Photos taken before and after installation
- Dates of the first leaks or visible defects
- Locations of interior stains
- Weather conditions when a problem appeared
Do not walk on a steep, wet, icy, or damaged roof. Roof surfaces can be slippery, and hidden weak spots may exist around skylights, valleys, and roof edges. If there is active leaking near electrical fixtures, sagging ceiling material, or visible structural damage, keep clear of the area and address the immediate safety risk first.
Which problems require urgent attention?
Active leaks, sagging roof decking, missing sections after wind, exposed underlayment, and water entering near electrical wiring should not be treated as cosmetic concerns. Continued moisture can damage insulation, framing, ceilings, and wall assemblies.
A roof that appears mostly sound may still need further evaluation if several warning signs are present, especially around valleys, penetrations, roof-to-wall joints, and the eaves. Those locations handle concentrated water flow and are particularly important during heavy rain, snowmelt, and freeze-thaw conditions common in the community.
